| | Home | | Supply Co | | e-Bookstore | | Updates | | Calendar | | Contact Us | | Bookmark Us | |
Subscribe FREE and get our e-BOOK with Bath and Body Works Type
Formulas! ![]()
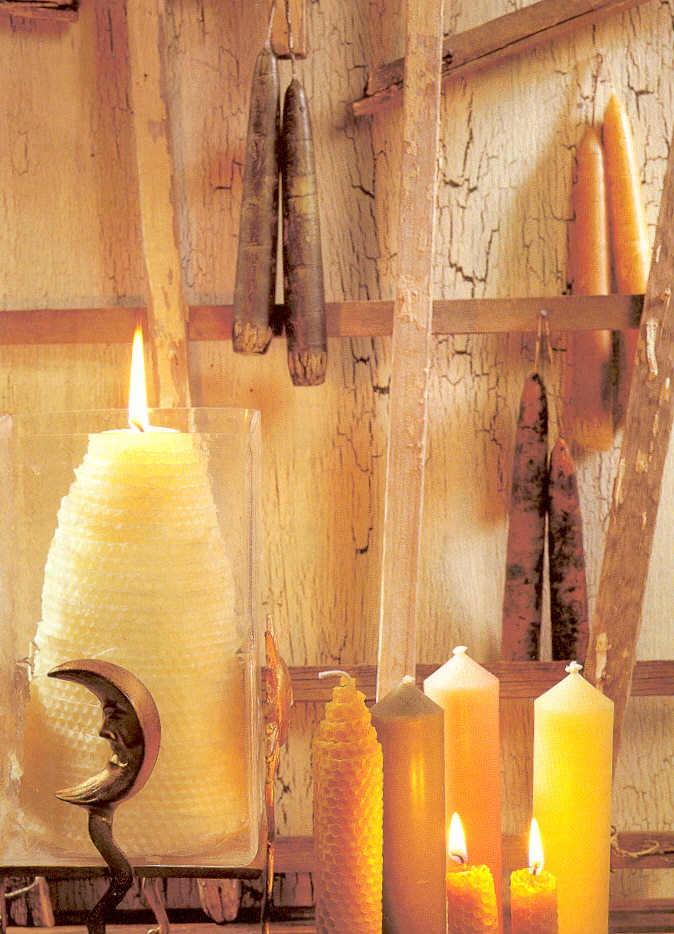
Making Hand Rolled Beeswax CandlesThat Offer a Natural Light Scent of Honey People who are allergic to fragrance find this type of candle to be perfect for their needs. When making beeswax candles, no fragrance or pouring is required so beeswax candles are also the easiest of all candles to make! Out of every candle style we work with we love the bees wax the most because it is so elegant when burning. As the candle burns the outer shell tends to stay standing and thus provides on of the most romantic luminary effect known to candle world. The photo above is an excellent representation of what a finished beeswax candle looks like. We bought Hurricane glass from Michael's Craft Store or Wal-Mart to go over our finished product a really set it off. Beeswax is very sticky and will melt onto a table so be sure to place a disposable item under it when burning. You can find these breathtaking bees wax sheets, as well as cotton-braided wicks at the Mabel White Supply Company www.mablewhite.com/SupplyCo Beyond the fact pure beeswax
candles have a delightful sweet fragrance, they tend to burn longer, more clearly,
and give off more light than any other candles. Consider Red and Green beeswax
sheets for Winter, Orange for the Fall, Pink for Spring and Violet for Summer. One full sheet of honeycomb when
rolled into a candle burns approximately eight hours. Half a sheet, when rolled
into a candle will burn approximately 4 hours. Materials Required:
Creative Tip: When beeswax sheets are warmed,
they become a natural adhesive allowing glitter, sequins and other appliquéd
material to be applied to your rolled candle. Add your own personal touch to
rolled candles for home decor or seasonal themes. Caution: Always make sure your
materials are fire retardant. For example, use polyester glitter only. Directions for Bees Wax Candles: Follow these basic directions on
any style of candle you make. 1. Choose
the style of candle you are making. Note that excess sheets can be used for little
tapers! 2. Using
your sharp knife and ruler edge, cut the wax on your cutting surface as indicated
by the style pattern of your choice. Avoid short, jerky motions. We prefer to roll three or four sheets up
tight—without cutting, and then slice the last sheet at an angle so the
beautiful layers can appear.
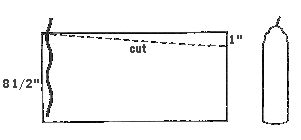
Measure 1" from top of flat sheet as
shown. Take ruler from top corner of sheet and line up with 1" mark and cut.
One inch cut part becomes scrap wax. Place wick as shown and roll. Gives top of
candle a slight taper finish or pencil top. 3. Occasionally,
a dusty film or "bloom" can form on sheets of pure beeswax. This bloom
is a natural occurrence and illustrates the 100% purity of your honeycomb sheets.
To remove this bloom, lay the sheet of wax on your cutting surface, take your
hairdryer a minimum of 3" from the wax and move it from end to end across the
wax. 4. Ensure
the warm air is at the angle to flow into the honeycomb pattern. Apply heat to the
reverse side if needed. Caution: DO NOT apply too much heat as this makes the
honeycomb sheets too soft and very difficult to handle. 5. Place
the wick along the edge of the sheet as indicated in the pattern. The wick should
extend beyond the top 1/2 inch and stop 1/2 inch before reaching the bottom end of
the wax sheet (safety measure). Fold over enough wax to cover the wick. Gently
press down the wax, covering and thus securing the wick. This step is important,
so if the wax seems hard to roll, simply take the hairdryer and warm the wax (this
will make it more pliable). If you have not wrapped the wax securely around the
wick, oxygen draws down the candle, causing it to burn too quickly. 6. Using
your fingertips, begin rolling the wax sheet around the wick. Take care to ensure
the wax sheet is being rolled firmly and evenly. The completed candle will burn
without smoking or dripping, unlike paraffin wax candles. If smoking or dripping
does occur, the candle has not been rolled firmly enough, is being burnt in a
draft or the wrong size of wick has been used. 7. The
seam of the candle is secured by warming the edge with a hairdryer and by pressing
down gently along the seam. 8.
Using the right candle wick is at the heart of every good burning candle.
Square braid as opposed to flat braid is generally recommended for beeswax
candles. Square braid wick supplied is recommended for 1" to 2 1/2"
diameter candles, the most widely used size.
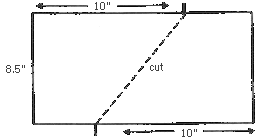
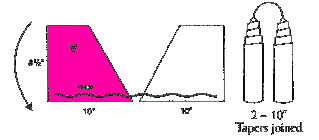
Measure 10" on top of sheet and mark.
Measure 10" on bottom of sheet and mark. Note: See from opposite ends as
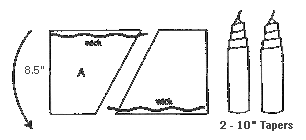
shown. Line up marks with ruler and cut. Separate sheets. Lay wick as shown and
roll. If you wish your tapers joined by a continuous wick, flip "A"
sheet over and place wick as shown to the right.
Excerpt from "How to Make Your Own Heavily Scented Candles" Mabel White Company. Content of these pages are the work product of Copyright Mabel White Dot Com, All Rights Reserved. |